
Introduction
Pumpkin painting has become one of the most creative and versatile ways to celebrate the fall season blending artistry, sustainability, and style into one delightful craft. Unlike traditional carving, which can be messy and short-lived, painting pumpkins offers a clean, customizable, and long-lasting alternative that suits all ages and skill levels. Whether you’re decorating your home for Halloween, creating elegant Thanksgiving centerpieces, or planning a fun weekend family project, painted pumpkins allow endless design possibilities from chic metallic finishes and minimalist matte tones to whimsical, hand-painted motifs. This step-by-step pumpkin painting guide will walk you through everything from surface preparation and paint selection to finishing, sealing, and displaying your pumpkins beautifully helping you create stunning seasonal décor that lasts well beyond the autumn festivities.
What Are the Benefits of Pumpkin Painting vs. Carving?
Pumpkin painting has evolved from a children’s craft to a sophisticated art form and décor technique. Unlike traditional pumpkin carving, which involves removing sections of the pumpkin’s flesh, painting preserves the pumpkin’s structure and extends its display life. It’s a no-carve alternative that reduces mess, prevents odor, and allows intricate artistry without the limitations of cutting tools. For parents, it’s also a safer, kid-friendly project no sharp knives or slippery pulp to handle making it perfect for classrooms, community centers, and family workshops.
Painting provides far greater creative flexibility. Artists can choose from a limitless palette metallic, pastel, matte, or glitter finishes and even integrate mixed media such as beads or decoupage. Moreover, the painted pumpkin can complement a home’s aesthetic: metallics suit elegant interiors, matte black suits modern minimalism, while vibrant ombré blends fit festive outdoor displays. Unlike carved pumpkins that last only a few days before collapsing, painted pumpkins often remain intact for several weeks when sealed and stored properly.
From an environmental and sustainability perspective, painted pumpkins can also be more eco-friendly. Faux foam or ceramic pumpkins are reusable, meaning your design effort lasts year after year. For real pumpkins, painting prevents early spoilage, giving you longer enjoyment of your seasonal centerpiece while reducing waste.
Why Choose Painting Over Carving for Longevity and Safety?
Carving creates open surfaces where moisture escapes and bacteria enter. This rapid dehydration leads to shriveling and mold growth. Painting, on the other hand, leaves the pumpkin intact, forming a protective coating that locks in natural moisture. When sealed properly with acrylic varnish or clear coat, a painted pumpkin resists softening for weeks, especially if kept in a cool, dry location.
Safety is another key advantage. Traditional carving involves knives and scoopers, which can pose injury risks especially for children or group activities. Painting requires only brushes and non-toxic paints, making it suitable for all ages. Even young children can enjoy creative participation without supervision hazards.
How Does Painting Reduce Decay and Extend Display Life?
Acrylic or spray paint creates a semi-permeable barrier over the pumpkin’s skin. This layer slows oxidation and moisture evaporation, much like how wax preserves fruit. Combined with a UV-protective sealant, the surface remains firm and glossy even outdoors. Faux pumpkins completely eliminate decay concerns, making them ideal for multi-year décor and professional event styling.
How Do You Prepare a Pumpkin for Painting?
Proper preparation ensures professional results. Start by examining your pumpkin for blemishes, bruises, or soft spots avoid any showing decay. Gently wash it using mild dish soap and warm water to remove dirt and residue, which can cause paint to bubble or peel. Dry thoroughly with a soft towel; moisture trapped under paint can lead to cracking later.
Next, decide whether you’re working with a real or faux pumpkin. Real pumpkins provide organic texture and color variation, but their surface can be waxy or uneven. Faux pumpkins made of foam, plastic, or ceramic offer a smooth surface and longer durability. Lightly sand glossy faux surfaces using fine-grit sandpaper (220–320) to help primer grip better.
Apply a gesso primer or matte acrylic base coat to create a neutral foundation. Gesso fills micro-pores, prevents paint from soaking unevenly, and helps colors appear more vibrant. A white or light-gray base is ideal for most designs. Allow the primer to dry completely typically 30–60 minutes before painting.
What Types of Pumpkins (Real or Faux) Work Best?
| Type | Texture & Look | Durability | Ideal For |
| Real Pumpkin | Natural texture, organic shape | Moderate (2–4 weeks) | Short-term seasonal décor |
| Faux Foam Pumpkin | Lightweight, realistic ridges | Long-term reuse | Outdoor décor & yearly reuse |
| Ceramic Pumpkin | Smooth, glossy finish | Permanent | Indoor displays & gifts |
| Plastic Pumpkin | Durable and budget-friendly | Reusable | Kids’ crafts, outdoor events |
Each type interacts differently with paint. Real pumpkins require more surface prep, while faux options accept most paints after light sanding and priming.
How to Clean, Sand, or Prime the Surface (e.g. Gesso) Before Painting?
Clean with a damp cloth and mild detergent, avoiding soaking. Let the pumpkin air dry fully. For glossy faux surfaces, a gentle sanding creates micro-texture for better adhesion. Apply a thin, even coat of acrylic gesso primer using a flat brush or foam roller, and let it cure for at least an hour. Priming helps prevent blotchy absorption and creates a consistent base for bright or metallic tones.
What Paints, Tools & Supplies Do You Need?
The materials you choose influence not only appearance but also the pumpkin’s lifespan. The essential trio includes paints, tools, and protective coatings.
Acrylic paint remains the top choice for pumpkin painting. It’s water-based, low-odor, non-toxic, and versatile enough for both opaque coverage and transparent effects. For quick and uniform results, spray paint works beautifully on faux pumpkins. Paint pens like Posca or Sharpie excel at detail work, lettering, and fine outlines.
Acrylic vs. Spray Paint vs. Paint Pens – Pros and Cons
| Paint Type | Strengths | Limitations | Best Uses |
| Acrylic Paint | Non-toxic, blendable, easy cleanup | Needs multiple coats | Layered and hand-painted designs |
| Spray Paint | Smooth finish, quick coverage | Needs ventilation & masking | Metallics, gradients, large pumpkins |
| Paint Pens | Precision for lines & text | Limited color range | Lettering, details, outlines |
Combining these paints enhances depth and contrast. For example, use metallic spray paint for the base, acrylics for mid-tones, and pens for accents or typography.
Brushes, Sponges, Masking Tape, Stencils, Palette and Mixing Tools
Different textures require different tools. Flat brushes provide broad, even coverage; angled brushes define edges and grooves; and round brushes add fine details. Foam sponges create ombré blends or cloud-like patterns.
Masking tape is indispensable for sharp lines, while stencils allow repeated motifs like stars or lace. Always keep a clean palette for mixing and testing tones before application.
Sealants, Clear Coats, Varnishes, Outdoor Protectants
Sealants are the unsung heroes of pumpkin painting. Once your design is dry, apply clear acrylic sealer, Mod Podge, or polyurethane spray in multiple thin layers. Outdoor-safe versions protect against UV rays, moisture, and mildew. Choose finishes matte, satin, or glossy based on your preferred aesthetic. Gloss sealers enhance color vibrancy, while matte finishes lend a modern, ceramic-like effect.
How Do You Paint a Pumpkin Step by Step?
Painting a pumpkin follows a systematic layering approach that transforms a blank surface into artwork. Start by setting up a well-ventilated workspace covered with newspaper or a drop cloth. Position your pumpkin on a stand or bowl for stability.
- Prime the Surface: Apply gesso or primer and let dry completely.
- Base Coat: Use acrylic or spray paint to cover evenly. Two coats ensure smoothness.
- Secondary Layers: Add shading, highlights, or color blocks using smaller brushes.
- Detail Work: Outline patterns, draw shapes, or hand-letter messages.
- Texture Additions: Use sponges, glitter, or metallic paints for dimension.
- Final Seal: Once dry, apply a clear sealant for protection.
How Many Coats, Layering, and Drying Times?
Two to three coats create full opacity, especially when covering dark pumpkins. Allow each coat 30 minutes to dry before layering. Overlapping wet layers can cause paint lifting or streaks. For humid regions, extend drying time and use fans to maintain air circulation.
How to Add Details, Shading, Metallic Accents, and Texture?
To build depth, apply darker shades into creases and lighter tones on raised ridges. Metallic highlights (gold, copper, silver) can be added with a dry brush technique. For texture, dab paint with a sponge or apply dimensional paint pens. A final touch of glitter or pearl glaze can transform the surface into a glowing statement piece.
What Are Creative Design Ideas & Styles for Pumpkin Painting?
Pumpkin painting has become one of the most enjoyable and imaginative ways to celebrate the autumn season, especially around Halloween and Thanksgiving. Unlike carving, which can be messy and time-consuming, painting pumpkins allows for more precision, color variety, and creativity. Whether you’re decorating for a party, a school event, or just sprucing up your home, there are countless design ideas and painting styles to explore.
One of the most popular approaches is the classic fall theme, featuring earthy tones like orange, gold, brown, and deep red. These designs often include leaves, acorns, and rustic patterns that fit perfectly into seasonal home décor. You can use acrylic paints for rich pigmentation and add metallic accents with gold or bronze paint for extra flair. Finishing touches like twine bows or artificial leaves glued around the stem give the pumpkin a cozy, farmhouse look.
If you’re going for a modern aesthetic, try minimalist or geometric patterns. Use painter’s tape to create clean lines, triangles, or abstract shapes. Monochrome palettes such as white pumpkins with black stripes or pastel pumpkins with gold details work beautifully for modern interiors. These designs also pair well with metallic spray paint finishes, giving the pumpkins a chic, contemporary vibe that fits in any living space.
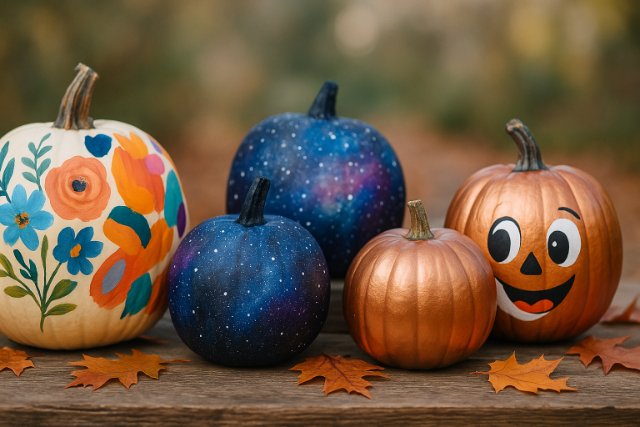
How to Do Ombré, Galaxy, Abstract Patterns, Seasonal Motifs
- Ombré Pumpkins: Blend two to three colors gradually using circular sponge motions. For example, fade from gold at the top to deep orange at the base.
- Galaxy Style: Apply black, purple, and blue layers; then flick white paint for stars. Finish with metallic shimmer for a cosmic glow.
- Abstract Art: Mix bold color splashes, brush textures, and freeform shapes ideal for modern homes.
- Seasonal Motifs: Paint autumn leaves, vines, acorns, or Thanksgiving patterns in warm earthy hues.
How to Use Stencils, Decals, Hand Lettering, and Mixed Media
Stencils make complex designs achievable for beginners. Secure them with masking tape, dab paint gently, then peel for crisp results. For personalization, hand-letter words like “Welcome,” “Give Thanks,” or “Trick or Treat” using paint pens. Add layers of mixed media lace trims, rhinestones, or fabric flowers to elevate the pumpkin’s texture and luxury.
What Modern Styles (Matte, Metallic, Earthenware, Distressed) Exist?
Modern décor trends favor a mix of natural and metallic finishes. Matte pumpkins mimic pottery or chalk-painted ceramics, while metallics gold, bronze, or chrome offer opulence. Distressed styles, created by lightly sanding edges after painting, provide rustic farmhouse charm. Earthenware tones terracotta, clay, and beige add warmth and sophistication to minimalist interiors.
How Do You Seal & Protect Your Painted Pumpkin?
Sealing and protecting a painted pumpkin is essential to preserve your artwork and extend the pumpkin’s life throughout the fall season. After investing time into painting your pumpkin whether for Halloween decor or a fall centerpiece applying a proper sealant helps prevent chipping, peeling, and mold growth caused by exposure to air and moisture. The right sealing method can make the colors stay vibrant and protect your design from weathering, especially if your pumpkin will be displayed outdoors.
To start, make sure the pumpkin’s surface is completely dry and clean before sealing. Any moisture, dirt, or oils can prevent the sealant from adhering properly, which may cause the paint to flake off. If you used acrylic paint the most common choice for decorating pumpkins allow it to dry for at least 24 hours before applying a sealant. For the best results, you can gently wipe the pumpkin with a soft, dry cloth to remove any dust or residue before sealing.
Next, choose a suitable sealant for your painted pumpkin. Clear acrylic sealers are among the most popular options because they come in matte, satin, and glossy finishes, allowing you to choose the desired look. A spray-on sealant offers even coverage and is easy to apply, but it should always be used in a well-ventilated area or outdoors. Alternatively, a brush-on sealer gives you more control for detailed areas but may take longer to dry. Mod Podge, polyurethane, or other clear protective coatings can also work well, depending on the type of paint used.
What Sealants or Clear Coats Are Safe for Outdoor Use?
Outdoor-friendly options include Rust-Oleum Painter’s Touch, Krylon Clear Finish, and Mod Podge Outdoor Sealer. These create a durable, waterproof barrier and resist sun exposure. For faux pumpkins, polyurethane sprays offer permanent durability. Avoid thick coats they can trap moisture and cause clouding.
How Many Layers, Drying Conditions, and UV Protection?
Two to three thin layers work best. Apply the next coat only after the previous one is fully dry. Always seal in a clean, dust-free environment. For outdoor pumpkins exposed to direct sunlight, UV-resistant sealants prevent yellowing or color fading.
How Do You Display & Maintain Painted Pumpkins?
Displaying and maintaining painted pumpkins properly helps them stay vibrant and last longer throughout the season. The way you position, protect, and care for them can make a big difference in both appearance and durability. Whether they’re part of a Halloween display, a fall centerpiece, or porch décor, a few practical steps ensure your painted pumpkins remain beautiful for weeks.
Start by choosing a clean, smooth pumpkin before you even begin painting. Dirt, waxy residue, or moisture can cause paint to peel or chip. Once painted, allow the surface to dry completely in a well-ventilated area this prevents smudging and helps the paint cure properly. If you’ve used acrylic paint, consider sealing your artwork with a clear spray sealant or varnish to protect it from weather, UV rays, and handling. A matte or glossy finish can be chosen depending on your preferred look.
When displaying your painted pumpkins, location is key. Keep them out of direct sunlight, which can cause fading, and away from heat sources that may accelerate decay. A shaded porch, covered patio, or indoor setting is ideal. Avoid placing pumpkins directly on cold or damp surfaces, as moisture can seep in and cause soft spots. Using a piece of cardboard, wood, or fabric underneath helps keep the bottom dry and stable.
Best Placement (Indoors vs Outdoors) and Avoiding Direct Sun
Indoor displays maintain color richness and pumpkin firmness longer. Outdoors, position pumpkins under a porch roof or awning to protect from rain. Elevate them on a wooden crate or straw base to prevent moisture buildup. Faux pumpkins handle outdoor conditions well, but still benefit from UV protection to retain brightness.
How to Touch Up Paint, Clean Surfaces, and Prevent Deterioration
Over time, dust and debris can dull the surface. Wipe gently with a dry or slightly damp cloth avoid soaking. For touch-ups, lightly sand peeling areas, repaint, and reseal. Proper maintenance lets you reuse the same pumpkin for several seasons, especially with faux bases.
Where Can You Buy Supplies & Painted Pumpkins?
You can buy supplies and painted pumpkins from a wide range of local and online retailers, depending on the type of look or style you’re going for. Many craft stores, garden centers, and supermarkets stock both unpainted pumpkins and all the materials you need to decorate them yourself. Stores like Michaels, Joann Fabrics, and
Hobby Lobby carry paint sets, brushes, stencils, glitter, and sealants everything needed for pumpkin painting projects. During the fall season, these stores often set up special sections devoted to Halloween and autumn décor, making it easy to find both supplies and inspiration in one trip.
If you prefer to buy pre-painted pumpkins, you can often find them at local pumpkin patches, farmers markets, and seasonal craft fairs. Many local artists and crafters sell hand-painted pumpkins in various themes from traditional autumn leaves to spooky Halloween designs and elegant farmhouse styles. These options are perfect for those who want a unique, handmade decoration without having to paint it themselves. Supporting local artisans also ensures your pumpkin décor stands out from mass-produced designs.
Major retail chains like Walmart, Target, and Home Depot also stock a selection of both painting supplies and painted pumpkins, especially as October approaches. Their seasonal aisles typically include acrylic paints, pumpkin carving kits, and fall-themed stencils, alongside decorative painted pumpkins that come in a range of sizes and finishes. Some are made of foam or resin for longer-lasting décor, while others are real pumpkins already painted and sealed for short-term use.
Which Craft Stores or Online Shops Stock Pumpkin-Painting Kits?
You can find all-in-one painting kits at Michaels, Joann Fabrics, Hobby Lobby, and Target, especially in fall collections. Online, Amazon and Etsy feature curated sets with brushes, paints, and stencils ideal for beginners or group workshops. Some sellers even offer themed kits like “Metallic Marble” or “Galaxy Pumpkins.”
What Brands of Paints, Brushes, Sealants Are Recommended?
For professional finishes, trusted brands include:
- Acrylics: FolkArt, Apple Barrel, Liquitex, DecoArt Americana
- Sealants: Mod Podge Outdoor, Krylon UV-Resistant Clear, Rust-Oleum Painter’s Touch
- Brushes: Princeton Select, Royal & Langnickel, or Artist’s Loft for versatility
- Paint Pens: Posca, Sharpie Oil-Based, or Arteza for precision lettering
Investing in quality materials ensures smoother coverage, fewer reapplications, and long-lasting vibrancy.
Conclusion
Pumpkin painting is far more than a seasonal pastime it’s a versatile art form that merges creativity, sustainability, and décor design. With proper preparation, surface priming, and sealing, your painted pumpkins can last weeks or even years when using faux bases. The craft encourages artistic exploration, from metallic finishes to mixed-media artistry, without the mess or decay of carving.
For home decorators, it bridges Halloween and Thanksgiving seamlessly, transforming simple gourds into luxurious centerpieces. Whether you’re a beginner experimenting with ombré gradients or an artist designing elaborate motifs, pumpkin painting empowers expression through color and texture. With evolving trends like matte pottery finishes, eco-friendly paints, and UV-resistant sealants this tradition remains timeless yet ever-modern.
Explore more insightful and valuable content on our blog VeoTag.com! Stay updated with helpful tips, expert advice, and in-depth articles that enhance your knowledge.
Read Also:
1. twitter media viewer: Download Tweets & Media
2. Why Updates Are Important JotechGeeks: Key Benefits & Best Practices
3. crypto30x.com ocean: Deep Dive into Features 2025
4. Gramhir Pro: Ultimate Guide to AI Image Generation
5. twitter profile viewer: view any public X profile anonymously
6. Twitter Account Viewer: How to Browse X Profiles Without Logging In
7. 5starsstocks.com: Review & Deep Analysis
8. Coomersu: Understanding the New Era of Emotional
9. nippydrive: Ultimate Guide to Features & Alternatives
FAQ’s
Acrylic paint is ideal for most designs. It dries quickly, adheres well, and offers vibrant pigment. For metallic or glossy looks, use spray paints as base coats and finish with a sealant.
Two to three thin coats provide even coverage and prevent cracking. Each layer should dry for at least 20–30 minutes before the next.
Use a clear, UV-resistant acrylic spray or outdoor Mod Podge. Apply multiple light coats and let them dry fully in between for weatherproof protection.
This occurs when the surface wasn’t cleaned or primed properly. Always wash, dry, and prime before painting, and avoid thick layers that dry unevenly.
Yes use a dry brush technique and minimal paint for texture preservation. Metallic or bronze stems add beautiful contrast.
When sealed and kept cool, a real painted pumpkin lasts two to four weeks indoors. Faux pumpkins can last for many years with proper care.
Absolutely. Gently sand the affected area, repaint with matching color, and reapply a thin layer of sealant for a uniform look.
Yes. Light etching removing the skin without cutting through creates texture that pairs beautifully with painted designs for a hybrid craft.