

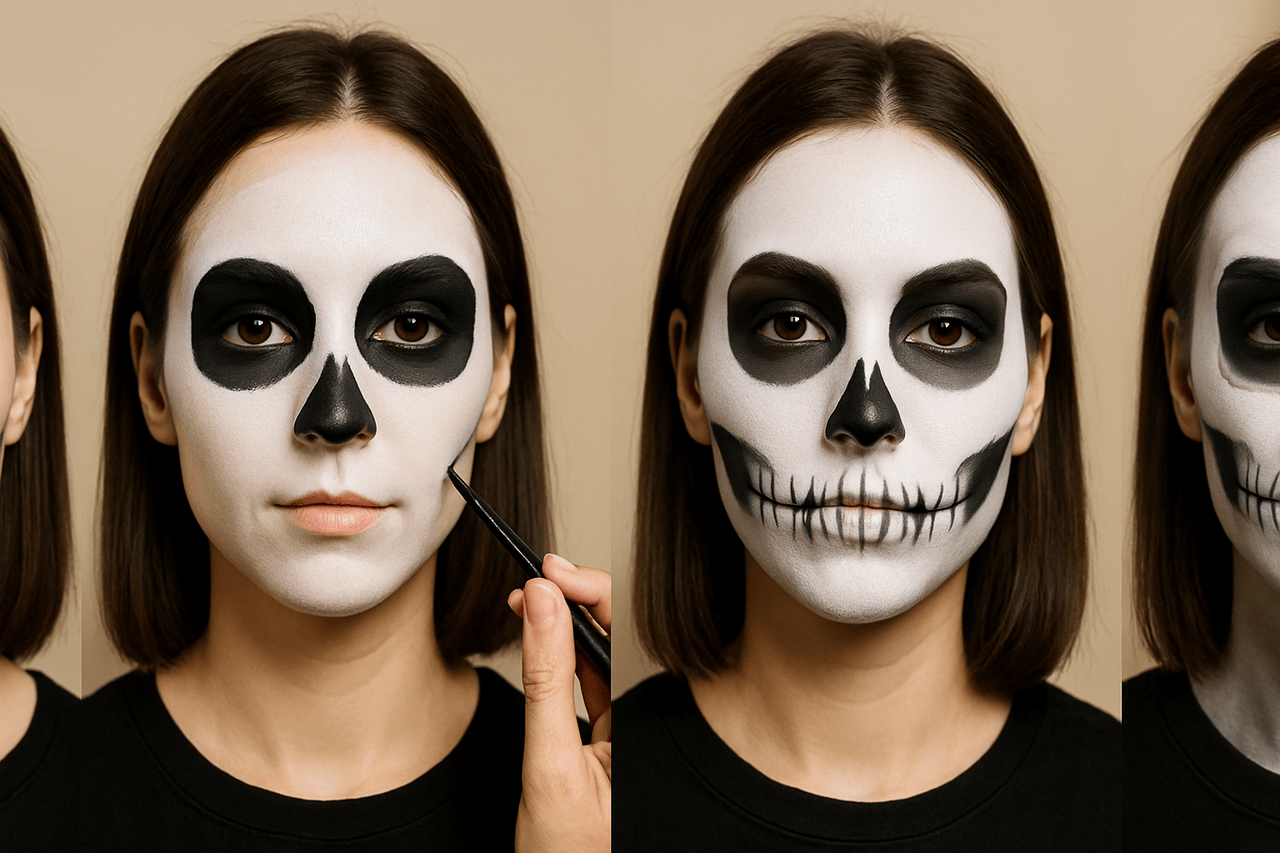
Creating easy skeleton makeup is one of the most timeless and versatile Halloween looks. It combines artistic creativity with simplicity, allowing anyone to achieve a bold, haunting appearance without needing professional skills. Skeleton makeup symbolizes the human skull, representing both the mysterious and the fun sides of Halloween celebrations. Whether you are attending a costume party, performing in a themed event, or just having fun with friends, this style allows you to stand out and showcase your artistic side.
This detailed guide walks you through every stage of the process, from preparing your skin and applying the white base to defining shadows, contouring bones, and adding creative touches. By following these steps, you can create an impressive skeleton design that looks professional, lasts for hours, and fits your personal style.
Prepare Your Face for the Skeleton Transformation
Preparation is the most essential step when creating any type of face makeup. Before you begin applying your skeleton design, your skin needs to be clean, smooth, and primed. This helps the makeup adhere better, prevents cracking, and keeps it comfortable to wear throughout the event.
Start by washing your face with a gentle cleanser to remove oil, dirt, and impurities. Follow up with a lightweight moisturizer that balances hydration without making your skin greasy. Moisturized skin prevents the paint from drying out or flaking. Once the moisturizer settles, apply a primer evenly across your face. The primer acts as a barrier between your skin and the paint, helping it glide on more smoothly and stay put for longer periods of time.
Gather Your Tools and Supplies
To begin your easy skeleton makeup, you need a few basic tools. Essential items include white face paint or cream makeup for the base, black face paint or eyeliner pencil for details, makeup brushes and sponges for application, translucent powder to set the makeup, and a setting spray to hold the final look in place.
Optional accessories like glitter, rhinestones, or colored eyeshadows can add creativity and uniqueness. Having all your materials ready before you start ensures a smooth and uninterrupted process. This also helps you avoid mistakes caused by rushing to find missing items mid-application.
Create a Long-Lasting Base
A long-lasting base is what separates average skeleton makeup from a professional-looking result. After applying your primer, let it set for a few minutes. Then, lightly dust translucent powder on top to control oil and create a smooth surface. This prevents smudging and helps the paint stick better. If you are attending an event where you may sweat or move a lot, this step becomes even more crucial. A solid base ensures your skeleton design remains intact and fresh throughout the night.
Test Your Makeup in Small Areas First
Before covering the entire face, test the products on a small area and observe how the formula behaves after it dries. For example, apply a small amount of white face paint near the jawline and move your face naturally for a few minutes. If the product immediately becomes patchy, feels excessively tight, or separates over moisturizer, adjusting the base before continuing can save time later.
You can also test how white and black products layer together. Apply a small white patch, allow it to set, and add a black line over it. A clean line indicates that the base is dry enough for detailed work. If the black pigment mixes into the white layer, give the base additional drying time or apply a light setting powder before creating the skull details.
Apply the White Base for Your Skeleton Canvas
The white base acts as your skeleton’s foundation. It represents the bones and structure of the skull, giving your face that iconic skeletal appearance. Achieving an even, smooth white layer is vital for making the rest of your details stand out.
Use a makeup sponge or a flat brush to apply white face paint or cream makeup evenly across your face, neck, and jawline. Blend gently around the edges of your hairline and ears to ensure consistency. Try to avoid thick layers, as they may crack or become uncomfortable over time. Thin, even coats create a more natural finish and feel lighter on your skin.
Blend for a Natural Bone Finish
After applying the white base, it’s time to blend. Use circular motions with a damp sponge to soften any harsh lines or streaks. This step helps achieve a bone-like matte finish. Blending is what makes the transition between colors smooth and realistic.
For a modern or creative twist, you can leave parts of your skin unpainted. For example, many people prefer half-skeleton looks where only one side of the face is painted. This not only saves time but also adds artistic contrast between life and death themes.
Use Strategic White Space for a Faster Skeleton Look
A skeleton face does not always require complete white coverage. Leaving selected areas of natural skin visible can create contrast while reducing application time. For example, keep the temples and outer forehead close to your natural skin tone while concentrating white makeup across the center of the forehead, nose bridge, upper cheeks, and jaw. The lighter central structure can make the painted bone areas appear more prominent.
Another easy variation is a split-face design. Apply the skeleton details to one side while keeping the other side relatively natural or using regular evening makeup. Instead of ending the skeleton section with a perfectly straight dividing line, use small cracks or irregular edges near the forehead, nose, and chin. This creates the impression that the skull is gradually being revealed beneath the skin.
Set the Base with Powder
Setting the white base is crucial to prevent smudging or transferring onto clothes. Once your white paint is completely dry, dust translucent setting powder evenly across your face using a fluffy brush. Concentrate on oily areas like your forehead, nose, and chin. The powder locks in the color, reduces shine, and helps your makeup withstand long hours under bright lights or during active events.
Define the Eye Sockets and Nose Cavities
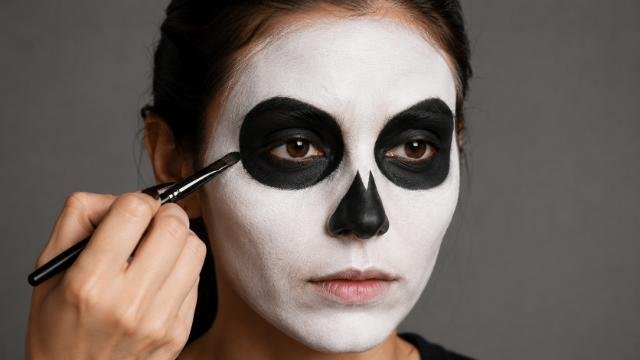
The most defining features of skeleton makeup are the hollowed eyes and nose. These dark areas give depth and contrast to your white base, creating that classic skull illusion.
Use black face paint or a thick eyeliner pencil to outline large circular shapes around your eyes. Extend the circles slightly above your brows and below your eyes to exaggerate the hollow effect. Once outlined, fill the shapes in completely with black paint for an even tone. For the nose, draw an inverted heart or triangular shape on the tip of your nose and fill it in with black.
Shape the Eyes with Precision
Symmetry is key when outlining the eyes. Uneven circles can distort the look and make it appear unbalanced. Use a fine brush for outlining before filling in the black areas. The top line should follow your natural brow curve, while the bottom should rest just under your lower eyelid.
You can also experiment with different shapes depending on your desired effect. Rounded shapes give a more traditional skeleton appearance, while sharp or jagged lines create a more frightening or stylized design.
Add Shading Around the Nose
The nose cavity adds realism when shaded correctly. Use a small brush to blend black or dark gray paint outward from the edges of the nose shape. Adding gray or dark brown eyeshadow around the black center creates a gradual shadow effect that mimics real bone depth. This subtle contouring enhances dimension and helps the makeup look three-dimensional under various lighting conditions.
Contour and Shade the Cheekbones
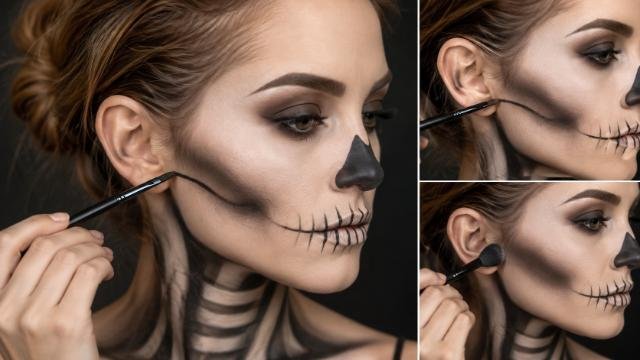
Skeletons are recognized by their deep, hollow cheeks. This effect is achieved through careful contouring and shading. To start, locate the hollow areas of your cheeks just beneath your cheekbones. Draw a curved line extending from the middle of your ear toward the corner of your mouth using a fine brush and black or gray paint.
Blend the upper edge of the line gently using a blending brush or sponge. The idea is to create a shadow that recedes naturally, mimicking the structure of bone beneath skin. Use circular motions to avoid harsh edges.
Create Depth with Gradual Shading
Layer gray and black tones to create a sense of depth. Start with a light gray base, then gradually add darker shades near the deepest part of the cheek hollow. This layering creates dimension and helps the skeletal structure look more authentic. Avoid harsh lines by blending softly into the white base, maintaining a smooth transition between shadows and highlights.
Adapt the Cheek Shape to Your Face
Instead of copying the same contour shape on every face, use your natural cheek structure as a guide. People with rounder faces can begin the dark hollow slightly higher near the ear and taper it toward the mouth. This visually separates the cheekbone from the jaw and creates a stronger skeletal structure.
On longer or narrower faces, a shorter cheek hollow can prevent the makeup from making the face appear overly elongated. Start near the center of the ear, curve the shadow beneath the natural cheekbone, and stop before reaching the corner of the mouth. Blend gray pigment above and below the darkest section to soften the transition.
Highlight the Bone Edges
To make your cheekbones pop, apply white highlighter or cream paint just above the shaded lines. This creates contrast and brings out the illusion of raised bone structure. Highlighting helps the skeletal design appear more dynamic and lifelike, especially in photographs or under spotlights.
Detail the Mouth and Teeth Design
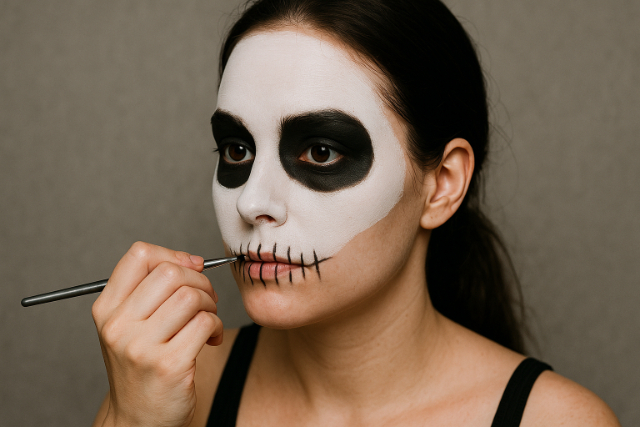
The mouth is a focal point of skeleton makeup. The skeletal smile transforms your face into a haunting, grinning skull. To start, use black eyeliner or face paint to draw a horizontal line extending from both corners of your mouth toward your cheeks. This represents the jawline connection.
Then, draw vertical lines across your lips and along the extended line to create the appearance of teeth. Keep the spacing consistent for a clean, symmetrical look.
Define Each Tooth Line
For a realistic effect, vary the width and thickness of each line slightly. The center teeth should be narrower and more compact, while those near the cheeks can be wider. Lightly shade between the vertical lines with gray paint or eyeshadow to enhance depth and realism. This simple technique makes your skeletal teeth appear embedded into your face rather than just drawn on.
Create Teeth Without Drawing Perfect Lines
Perfectly identical teeth are not necessary for convincing easy skeleton makeup. In fact, slightly irregular shapes can make a skull design look more natural. Begin with a thin horizontal line through the center of the lips, then place short vertical marks above and below it. Use the natural center of your lips as the starting point and work outward on both sides.
Add Shadows for Realism
Blend gray or black eyeshadow gently along the horizontal mouth line and between the teeth. This subtle shading adds dimension and prevents the design from looking flat. You can extend the smile lines further outward for a more eerie and dramatic appearance, especially if you are aiming for a creepy or theatrical skeleton look.
Add Finishing Details and Artistic Flair
Once you have completed the basic structure, you can elevate your skeleton makeup by adding creative or glamorous touches. Skeleton makeup does not have to be limited to black and white. Many modern versions incorporate color, glitter, and intricate patterns to express personality and style.
You can apply metallic eyeshadow around the eye sockets, highlight the cheekbones with gold shimmer, or decorate the forehead with rhinestones. Some people even add cracks or web-like patterns using thin detailing brushes to simulate aged bones or artistic effects.
Customize the Look by Theme
The beauty of skeleton makeup lies in its flexibility. You can tailor it to match your event or mood:
- A classic skeleton uses only black and white for a traditional skull effect.
- A glam skeleton includes shimmer, rhinestones, and bold eyeliner for a more elegant approach.
- A color pop skeleton incorporates bright paints like blue, red, or pink for creative expression.
- A half-face skeleton applies makeup on one side only, contrasting life and death in a dramatic artistic statement.
Balance the Look with Costume and Hair
Your costume and hairstyle should complement your makeup. Dark clothing or skeleton-print outfits enhance the eerie vibe. Consider tying your hair back to reveal your detailed face design, or spray it white or silver for a complete skeletal transformation. Accessories such as gloves or jewelry shaped like bones can further strengthen the theme.
Skeleton Makeup Style Comparison
| Skeleton Style | Difficulty Level | Tools Needed | Best For |
| Classic Black & White | Easy | White paint, black eyeliner | Beginners or simple Halloween looks |
| Glam Skeleton | Moderate | Glitter, gems, metallic paint | Parties and themed photoshoots |
| Half-Face Skeleton | Intermediate | Blending brushes, contouring tools | Artistic and dramatic effects |
| Color Pop Skeleton | Moderate | Colored paints, eyeshadow palette | Festivals or creative events |
| Realistic Skull | Advanced | Contouring kit, precision brushes | SFX makeup enthusiasts |
Quick Skeleton Makeup Color Guide
| Color | Purpose | Effect |
| White | Base layer | Represents bone and structure |
| Black | Shadows and outlines | Adds depth and contrast |
| Gray | Blending tone | Softens transitions between shades |
| Silver | Highlights | Adds metallic shimmer for glam styles |
| Red or Blue | Accent colors | Introduces creative visual impact |
Conclusion
Creating easy skeleton makeup is not about perfection but about creativity, expression, and confidence. By following these steps carefully from preparing your skin to contouring, shading, and sealing you can design a skeleton face that turns heads and photographs beautifully. The key to a flawless skeleton look lies in patience, blending, and understanding how light and shadow shape the face. Whether you choose a traditional skull, a colorful glam version, or a minimalist half-face design, the process is both fun and rewarding. With consistent practice, your skills will improve, and soon you’ll be able to craft a professional-grade skeleton transformation effortlessly.
Read Also: Cute Halloween Drawings: Create Adorable Spooky Art
FAQs
For beginners, it usually takes about 45 to 60 minutes. With experience, you can complete it in 30 minutes or less.
Yes, regular makeup works fine. White foundation, black eyeliner, and eyeshadow can achieve a similar look, though face paint provides better coverage and durability.
Use shading and blending techniques. Layer gray between black and white areas to add bone-like depth and dimension.
Most water-based paints are gentle. Always perform a patch test before full application to ensure no irritation.
Choose dark clothing or skeleton-printed outfits. Adding gloves, jewelry, or hair accessories that match the theme enhances the overall appearance.
Use micellar water, oil-based removers, or gentle cleansing balms. Follow with a mild cleanser and moisturizer to keep your skin hydrated and smooth.
